How I Simplified The Complex Kimble Data Task With ChatGPT-4: A Step-By-Step Guide For Non-Techies
As a non-technical professional, I used to break out in a cold sweat when faced with managing large, complex data sets. Cryptic file names, labyrinthine spreadsheets, and inscrutable data connections overwhelmed me. I avoided these kinds of messy data tasks at all costs.
That is until I discovered how AI tools like ChatGPT-4 could guide even absolute beginners through the data wilderness.
In this lengthy tutorial, I’ll walk through my real-world experience using ChatGPT-4 to unravel, decode, and simplify a complex data extraction project. You’ll learn:
- How ChatGPT comprehended connections between exported CSVs and binary files
- The step-by-step process to identify and convert binary file formats
- How ChatGPT provided custom Python scripts to automate tedious tasks
- Detailed instructions to install Python and necessary libraries
- Exactly how to recreate each phase of the data decoding process
Follow along to see how this revolutionary AI can turn complex data from a terrifying maze into an exciting adventure for non-technical users.
The Nightmare Project: Making Sense of Exported Kimble CSVs and Binaries
My data journey began when I was tasked with extracting and compiling critical company information stored in the Kimble application across disconnected systems into a master data set.. This included:
- Hundreds of CSV files with metadata exported from our Kimble app
- Thousands of cryptically named binary files holding raw Kimble data attachments
- No documentation on how these CSVs and binaries related
Faced with this hairball of Kimble data, I immediately felt that familiar anxiety bubble up. How would I ever decode the connections between these files? What type of Kimble information did those inscrutable binary files hold? Just glancing at the mountain of data made my head spin.
My only option was to seek help from a developer or data engineer. But that meant endless rounds of explanations, waiting for availability, and hoping my descriptions were clear enough.
This time, I decided not to wait and to see if AI could cut through the confusion before burdening an expert. Enter ChatGPT-4.
ChatGPT-4 Illuminates the Connections Between CSVs and Binaries
I began my conversation with ChatGPT-4 by providing sample data from the CSV exports and binary files. I explained I needed help understanding how they related to each other.
In mere seconds, ChatGPT parsed the structure of the Kimble data and delivered pivotal insights:
- The CSV files contained metadata, including a unique “Id” field
- This “Id” matched each CSV record to its corresponding raw data binary file
- The binaries held the actual data content for each item
This was a revelation! I finally grasped how these files are interconnected based on the Id metadata column. ChatGPT illuminated the hidden data map that linked thousands of Kimble records in seconds.
Now I could connect the data points across files. But what type of information did those mysterious binaries contain?
Leveraging Metadata to Decode Binary File Types
The next step was identifying what type of Kimble data each cryptic binary file held. ChatGPT had a clever solution:
- Use the “Name” column data from the “Attachment.csv” file
- Create a mapping between the binary file name and its Id provided in the Kimble attachments list
- Rename the binaries with the correct file extension
ChatGPT illuminated this elegant approach to crack the binary code using existing Kimble metadata.
Once I had connected the dots between the metadata CSVs and binary files, I wanted to implement some enhancements to make accessing and analyzing the attachment data more seamless. This involved a few key steps:
Step 1 – Rename Binary Files for Clarity
The raw binary files exported from Salesforce/Kimble had generic names like “00P0X00001aAz8bUAC” which provided no context on the contents. To fix this:
- I created a dedicated “Attachment_upd” folder to store the renamed files
- Used a for loop in Python to iterate through each row in the CSV
- Extracted the original attachment name from the Kimble metadata
- Copied the associated binary to the new folder
- Renamed it as “BinaryFileName_OriginalAttachmentName”
Such a file like “00P0X00001aAz8bUAC.bin” would now be called something much clearer like “00P0X00001aAz8bUAC_March Sales Invoice.pdf”.
Step 2 – Generate Clickable Attachment Links
I wanted to directly link each CSV row to its corresponding renamed attachment file to avoid having to hunt through folders.
- Added new “Attachment Link” column to CSV
- Used Python to construct a direct URL to the attachment based on the renamed binary file
- Populated the new column with clickable hyperlinks
Now each CSV row had a handy, clickable link that opened the matched attachment.
Step 3 – Convert CSV to Excel Format
For enhanced data analysis, I converted the CSVs into Excel format:
With the Kimble data now in Excel format, I could leverage features like filtering, formatting, conditional formatting, charts, and more.
Together, these steps enabled me to turn the exported Kimble Salesforce data into a well-organized, easy-to-analyze set of attachments with intuitive direct access from the metadata CSVs. The process helped me level up my Kimble data skills!
Step-By-Step Instruction to Recreate the Process
As our organization transitioned away from the Kimble platform to a new system, retaining easy access to historical Kimble records became a priority. This data needed to remain available both for finance to perform analysis and reporting as well as potential audits.
However, maintaining an active Kimble subscription was costly and unnecessary since we had moved to a different solution. The objective was to cancel Kimble while still providing our teams with straightforward access to critical legacy data and attachments.
My role was to develop a process to export essential Kimble data before closing our account. This exported data had to meet certain requirements:
- Include all necessary tables, fields, and attachments
- Be extracted in formats finance could easily work with
- Maintain links between records and corresponding attachments
- Resulting in a well-organized archive that could be referenced as needed.
If somebody would have the same task, maybe the following instructions would be helpful and time-saving.
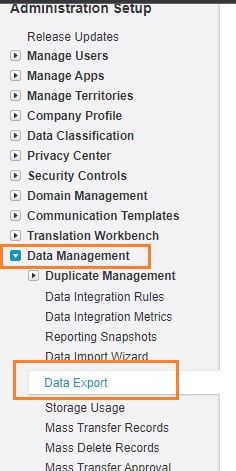
-> First of all, you need to have admin access to Kimble. -> Go to Admin -> Setup -> Data Export (left sidebar) -> and click Export Now:


-> After the Kimble data export is finished, you will have a lot of folders archived in ZIP.
-> Unzip the exported kimble data; you will have a lot of folders containing a huge amount of *.csv and binary files
-> Create a separate “SalesforceData” folder to make the process more convenient for non-techie :). Under this directory create four more folders: “CSV“, “Attachments“, “CSV_output” and “Attachments_upd“.
-> Save unzipped binary files and the “Attachment.csv” file in the “Attachments” folder
-> Save the other *.csv files in the “CSV” folder.
-> Install Python: If you haven’t already, you must install Python on your computer. You can download it from the official Python website (https://www.python.org/). Please download the latest version.
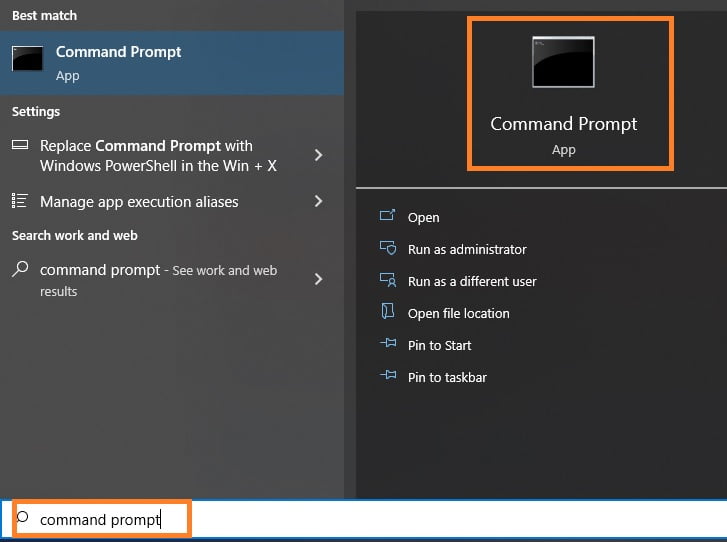
-> Install Necessary Libraries: The script uses a library called pandas, which may not come pre-installed with Python. To install it, you can open a terminal (Command Prompt on Windows, Terminal on MacOS) and type “pip install pandas openpyxl”. On Windows, this is typically called Command Prompt or PowerShell. You can search for it in the start menu. On macOS, you can find Terminal by opening Spotlight (press Cmd + Space) and typing Terminal.
pip install pandas openpyxl

-> Save the Script: Next, you’ll need to save the Python script. You can open a text editor, copy and paste the script, and save it as a .py file. Copy the script below and create .py file and save it in the “SalesforceData” directory named “rename_files.py“. (Just in case, I have the free Notepad++ app installed and used this app for .py file creation).
Please don’t forget to change the absolute path to the directories. You should have the correct path before: …\\SaleforceData\\…
attachments_dir = ‘C:\\Users\\Your_Name\\Desktop\\SalesforceData\\Attachments’
csv_dir = ‘C:\\Users\\Your_Name\\Desktop\\SalesforceData\\CSV’
output_dir = ‘C:\\Users\\Your_Name\\Desktop\\SalesforceData\\CSV_Output’
new_dir = ‘C:\\Users\\Your_Name\\Desktop\\SalesforceData\\Attachments_upd’
import os
import pandas as pd
from openpyxl import load_workbook
import shutil
import re

# Replace these with your actual directories
attachments_dir = 'C:\\Users\\Your_Name\\Desktop\\SalesforceData\\Attachments'
csv_dir = 'C:\\Users\\Your_Name\\Desktop\\SalesforceData\\CSV'
output_dir = 'C:\\Users\\Your_Name\\Desktop\\SalesforceData\\CSV_Output'
new_dir = 'C:\\Users\\Your_Name\\Desktop\\SalesforceData\\Attachments_upd'

print("Directories set up...")

# Load the attachments CSV into a DataFrame
attachments_df = pd.read_csv(os.path.join(attachments_dir, 'Attachment.csv'), encoding='ISO-8859-1')

print("Loaded attachments...")

# Create a mapping from ParentId to local file path
id_to_path = {}
# Copy files to the new directory and rename them
for _, row in attachments_df.iterrows():
    old_path = os.path.join(attachments_dir, row['Id'])
    # Remove non-ASCII characters and illegal characters for file names
    clean_name = re.sub(r'[^\x00-\x7F]+', '_', row['Name'])  # Remove non-ASCII
    clean_name = re.sub(r'[<>:"/\\|?*]', '_', clean_name)  # Replace illegal characters
    new_filename = row['Id'] + '_' + clean_name
    new_path = os.path.join(new_dir, new_filename)
    if os.path.exists(old_path):
        shutil.copy2(old_path, new_path)
        id_to_path[row['ParentId']] = new_path

print("Files copied and renamed...")

# Go through each CSV file
for csv_file in os.listdir(csv_dir):
    if csv_file.endswith('.csv'):
        print(f"Processing {csv_file}...")

        # Load the CSV file into a DataFrame
        df = pd.read_csv(os.path.join(csv_dir, csv_file), encoding='ISO-8859-1')

        print(f"Loaded {csv_file} into DataFrame...")

        # Create a new column for the attachment link
        df['Attachment Link'] = df['Id'].map(lambda x: id_to_path.get(x, 'No attachment'))

        print(f"Attachment links added to DataFrame...")

        # Save the DataFrame to an XLSX file in the output directory
        xlsx_filename = os.path.splitext(csv_file)[0] + '.xlsx'
        df.to_excel(os.path.join(output_dir, xlsx_filename), index=False)

        # Load workbook
        wb = load_workbook(filename=os.path.join(output_dir, xlsx_filename))
        ws = wb.active

        # Convert the column of file paths to Excel HYPERLINK formulas
        for row in ws.iter_rows(min_row=2, max_col=ws.max_column, max_row=ws.max_row):
            file_path_cell = row[-1]
            file_path = file_path_cell.value
            file_name = os.path.basename(file_path)
            file_path_cell.value = f'=HYPERLINK("{file_path}", "{file_name}")'

        wb.save(os.path.join(output_dir, xlsx_filename))

        print(f"Saved DataFrame to {xlsx_filename} in output directory...")

print("Script execution completed.")
-> Open a terminal, and navigate to the directory where you saved the .py file. To navigate to the directory where you saved your Python script, you will use the cd command in your terminal (Command Prompt on Windows, Terminal on macOS or Linux). The cd command stands for “change directory”.
- If you’re on Windows, your command will look something like this:
cd C:\path\to\your\directory - If you’re on macOS or Linux, it will look like this:
cd /path/to/your/directory

You should replace /path/to/your/directory or C:\path\to\your\directory with the actual path to the folder where your Python file is located.
To find the path where you saved the Python script, you can navigate to the folder using your file explorer (Finder on Mac, File Explorer on Windows) and then copy the path from the address bar.
-> Verify Your Current Directory: After you’ve entered the cd command, you can type dir and hit Enter on Windows or ls and hit Enter on macOS/Linux to list the files in the current directory. You should see your Python script listed.

-> Run the Script: Now you’re ready to run the script. Open a terminal, navigate to the directory where you saved the .py file (using the cd command), and then type python rename_files.py to run the script. It may take a lot of time depending on the modification of your laptop or PC.
python rename_files.py
-> Enjoy the results
After I had it all done, I needed to upload all these Kimble files on SharePoint. I had some issues with the upload itself and described how I resolved it using chatGPT’s help here.
Also, I created the *.xlsx file “All_files.xlsx” containing names, short descriptions, and links to all the converted from csv *.xlsx file to make it and tagged the most important Kimble files as “invoice”, “expence”, “timesheet” to make it easier to find the needed information for my colleagues.
Conclusion: AI is a Game Changer for Non-Technical Users
This experience demonstrated how AI, like ChatGPT, can empower non-experts to work smarter with data.
Be Specific: Clearly stating your requirements helps the AI understand your needs. In our dialogue, I asked for specific content sections and what each section should include. I specified types of files (.csv, .xlsx), and the software I used (Salesforce).
Provide Context: Giving context to the request helps the AI generate more accurate and relevant responses. I gave a background about my task, my problem, and what I needed the AI to do.
Progressively Detail Your Request: Breaking down the overall request into smaller, more manageable parts can lead to more precise outcomes. I asked for each part of your content separately, building on the previous part. This method also makes it easier to review and make corrections if necessary.
Request For Modifications If Necessary: Don’t hesitate to ask for changes if the AI’s first attempt doesn’t fully meet the requirements. I provided feedback and asked for modifications to ensure the final output was as you desired.
Guide The AI: In cases where I need the AI to perform a complex task, I guide it by outlining the steps or offering examples.
Reuse Proven Patterns: I reuse that pattern in future interactions once I find a question structure that yields the desired results. For example, the pattern I used to ask for different parts of the content was used in other similar scenarios.
And, of course: No real company name, no real data examples, and no real data copy-past, etc., as it might bring a big risk and a big trouble. 🙂
Remember, AI communication is a dynamic process. You might need to tweak your questions based on the specific task at hand and the responses you get.


